Friday, December 6, 2019

Lessons Learned from Milton's

I recently completed the model of Milton's, a structure that was almost entirely 3D printed.  This project was largely a proof of concept for some of the building and finishing techniques needed for 3D printed models.  Here is a summary of the key take-aways:

Picture from Google StreetView
Research:  I did a lot of research using public domain materials.  In particular: Google StreetView was used for several pictures of the building.  County property tax records provided the dimensions of the footprint (pic).  That being said, it was also very helpful to get my own pictures on site.  (Also, please note the current window awnings are indeed purple, not striped green in the old Google picture.)
Footprint from Property Tax Records (Public Domain)

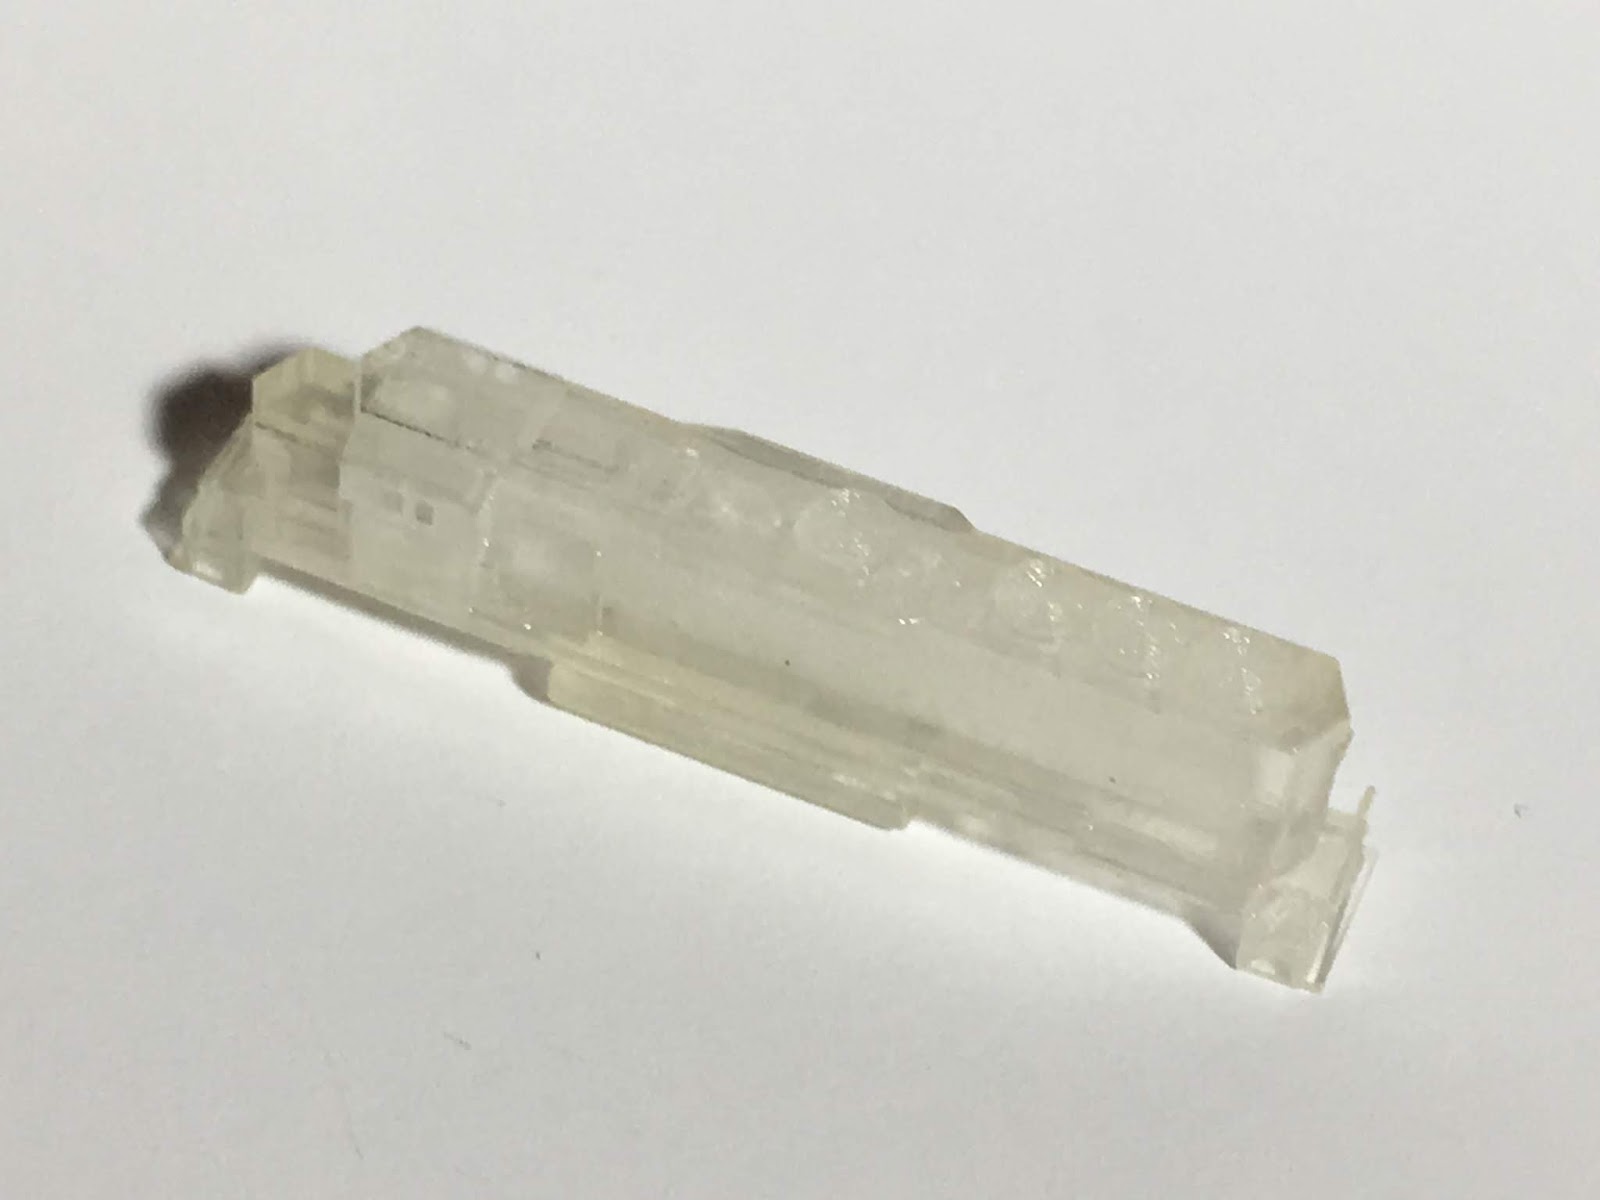
Design:  The design came together quite quickly, only taking a couple days off-and-on work.  I wanted to just create the building as a solid 3D print, not as a kit of parts (walls, roof, etc) to be assembled.  Again I used my "go-to" 3D design program TinkerCad.  (Side note: I still have yet to find a good reason to change to something more sophisticated--and costly--than TinkerCad, which is free btw..).  I decided not to add any texture on the exterior (brick) as at 1:450 it wouldn't have any resolution.  In larger scales this might be needed but not T scale.  In fact, a pleasant surprise was some slight texture that resulted from the 3D printing process itself, resembling brick.  Another positive take away is I was looking for a good way to preview the model outside of TinkerCad, and found the program Autodesk Viewer, which give a variety of ways to view STL files online and is also free. 
Rendering in Autodesk Viewer

Building:  The cost to 3D print was acceptable if a tad high, but could get really costly for a larger structure--the final dimensions are close to 3 in" x 2" x 1", cost was about $40 not including shipping.  By contrast, the much larger Sharonville Engine House was created as a lay-flat kit of 4 walls and some detail parts and cost around $25.  If this was going to be a "regular" model in the product line I would probably arrange it as a set of parts--roof, walls, details, but no base.  The base can be built up easily enough from foam/plaster/DAS modeling clay etc.

After I received my print, a couple details were missing, but these were very small parts such as a railing on the deck, and a couple of window sashes.  In addition, the gutters didn't make it, but that was my fault--I added them late in the design and didn't attach them securely enough.  This would be revised easily enough and they would survive subsequent printings I'm sure.  I cleaned and "prepped" the model as I normally do with Future floor polish.

Painting:  I primed the entire model with Tamiya Oxide Red primer.  Not only is this a good primer but it serves well as a red brick color.  So no other color was added to the brick walls.  Another point to note: This is a lacquer based paint, and dries "tough".  This is important because the details, like the stone window header/footer, foundation, roof, etc. are all painted in acrylics.  I'm a good painter but not a miracle worker, so any misses/slips,etc that go beyond the intended area, are easily cleaned off.  My secret here is toothpicks and airbrush thinner.  I take a toothpick, whittle it to a point, then dip in the airbrush thinner.  I then gently scrub/scrape the surface, re-dipping in thinner as needed to remove the offending (acrylic) paint but the color underneath isn't affected.  

Added details:  I replaced the missing sashes with strip styrene and touched up.  I replaced the missing railing on the deck with a piece of thinned Tamiya tape.  This was then covered with a layer of MicroScale Krystal Klear (my secret miracle goo), then touched up.  The standing seams on the roof were added by slicing down Tamiya tape to very thin (about 0.20mm) strips and sticking to the roof.  Ends were trimmed off with fingernail clippers.  The roof was then brush painted with a light gray Vallejo.  The fire escape and fence were both kit-bashed from a 1:450 scale etched fret of warship details, glued in place with Krystal Clear -after- painting.  The sign was a real PITA, the little chains that it hangs from (very thin gauge wire strands) were giving me fits.  Lesson here: Attach wires to the sign, THEN to the pole.   The window awnings were strips of sheet brass.

Window Technique:  The windows were made using my "secret glass technique".  I seem to be the only one doing this;  They are just clear decal film applied individually to each window.  They are cut slightly larger than the window frame and giving a nice coat of MicroSol (decal solution).  When they dry, they tighten up and result in a great thin looking, flat glass appearance.  I prefer this vastly to using Krystal Klear for the windows!  When dry, I touch up around the window with matte lacquer (Dullcote).  One tip:  Keep the windows shiny.  I might over-spray the entire model with Dullcote, and if you do, the windows will look frosted or dirty.  No worries: They can be made clear again with my favorite stand-by, Future.  It's better not to Dullcote them in the first place tough.  Brushed on Dullcote is just fine, and avoid the windows or other areas you want to keep glossy. 

Lighting Possible:  I contemplated adding LED lighting -after- the model was done, and have opted not to light it for now.  Future designs will take this into consideration, and have better access to the interior and perhaps wiring conduit/access panels by design.  The interior would also need to receive a coat of matte black to act as a light barrier (then painted over with a lighter gray or tan) so it wouldn't have a glowing appearance. 

Basically, the model is completed.  I may weather it (the street looks too black for one thing) and add some people milling around, litter, etc.   Overall a very rewarding and educational model making project!  If you'd like any additional information, to purchase a copy of this model, or to suggest (or commission) a model, please contact me at ccetrains@gmail.com.  -Jesse

Monday, December 2, 2019

Updates 12/2

I have lots of projects underway so I thought I'd share the status for the interested T-scalers out there.
  • Couplers:  Revised coupler with incorporated air hose and articulation completed and has been adopted as the standard coupler for CCE Models T-scale trains.  This coupler looks good, and it does uncouple via a gentle vertical "poke" on the shank with a small (.15mm or so) wire.  Given my lack of real coupling/uncoupling operations, this will serve well enough.  I would prefer it was made in a stronger plastic, but that will come in time with developments in 3D printing.
  • C40-8W:  Test model was received and everything fits together well.  A couple minor revisions in the details which are so fine that they don't even print.  3 different cab versions and 2 different radiator versions are available.  Cabs:  Low headlight/Low numberboards (UP, CSX),  Hi headlight/Low numberboards (CR, NS),  Low headlight/Hi numberboards
  • Metra MP36/Gallery Car Commuter train:  All prototype design work is done and prototypes on the way for this very ambitious project.  This series of models is unique in that they are all designed to be configured in either of two variations:  An "Operator" version with the standard TGauge chassis and couplers (for those who want to run them interchangeably with the standard models) as well as a "Prototype" version with CCE Couplers, more detailed underframes, etc.  The Prototype version MP36 won't be powered if the dummy Blomberg M trucks are used, however it could be powered if the sideframes of the stock trucks were sanded down and the Blombergs cannibalized.  Or it can be pushed by one of the Gallery cars, which are also designed to accept powered chassis, but equipped with CCE Couplers.   I plan to custom decorate a "train set" of these in the Metra Rock Island heritage scheme, consisting of  locomotive, gallery cab car, and two gallery coach cars, and would be glad to also make some for interested customers.  Did I mention the locomotive and cab car will have lighted headlights.  
  • Structures:  Received the test print of the turntable and it came out reasonably well, but I wanted to tweak a couple of things.  I'm working on a diorama of the Sharonville Engine Facility that contains the engine house and turntable--and fits completely on a single sheet of paper.  This, plus the Metra train set, I hope to exhibit next spring at some train shows.  Miltons is nearly completed.  I have not done the windows yet, and intend to use my decal film technique. 
  • Misc:  Revised the Roller Bearing trucks to have a more accurate profile.  Revised the 45' dry van trailer with better details.  Testing a Zn2 scale Arch Bar truck that were custom designed for a customer.

Stay posTed!  Jesse 


Friday, November 22, 2019

Structured Thoughts


Most of my projects in T scale to date have been rolling stock.  The occasional lineside details--signal relay box, signals, catenary, etc.--but few buildings.  This is changing.  I did a model of "Nassau" tower on the Northeast Corridor, but it's still undecorated awaiting the Princeton diorama.  I have two (really three) "live" projects underway now though.  One is a local building owned by a friend (Milton's).  The other(s) are the Sharonville, OH  Conrail (ex-NYC) engine house and turntable.  All have good progress to date, and I'm currently in the process of finishing the local building.  The Sharonville shop is on the bench in kit pieces and the turntable is en-route from Shapeways.  Here's my report on these structure projects.


"Miltons" --the local building-- is an old Federal Style brick row structure sharing a wall with another.  It was constructed in the early 1900s and currently has a local tavern in the first two floors.  Here's how it looks today:


 I drafted it in TinkerCad (I keep thinking one day I'll learn something "more sophisticated" but why?  This does the job well) and design work took me a couple days off-and-on.  It was drafted and printed as a single piece, with the streets and sidewalks 3D printed along with the main building.   The rendering of Milt's (as it's known) has a simple interior.  The first floor has the bar, there are floors, and major walls, but that's it.  It has some relatively fine detail on the exterior such as a deck/stairs on the back, chimney, dormer, and window mullions.  It will get some additional detail such as window shades and signage.


One reason I did this was as a learning experience.  Some take aways from Miltons:
  • The small striations from 3D printing actually enhance the look of brick. 
  • Mullions did print
  • The deck and stairs printed well, but the railings are very delicate.
  • Printing as one piece negates the need to square corners, or really do any assembly.  NO warpage to deal with (see Sharonville EH project.)
  • Painting is easier than expected. 
  • The gutters didn't stick, or were just missing.  They must've fallen off in the cleaning process at Shapeways.. I'll add some made of strip styrene. 
  • Primed with red oxide paint, and it looks good as brick.
 Here's a look at it after partial painting.  So far so good.


The Sharonville Engine Facility is comprised of two componenets:  The Shop and the Turntable.

The Shop Building was done more as a traditional kit, with walls to be assembled and some detail add on parts: doors, roof vents and jacks, and two drop pits. Here's what it looked like from the printer:
Notice is has support sprues between the walls.  Also, the detail parts are tucked between the walls as well.   Here it is after being prepped for painting (clear coat and primer).


Take aways so far:

  • Kit style construction is far cheaper to print for larger buildings
  • Window mullions printed but a good amount failed. It's probably better to use etched material for this.
  • There was some warpage.  No big problem though, soak for a minute in hot water, put under a book on a flat surface, and let cool.  Problem solved!
I have not done any further construction so will update the Blog as this goes on.

The other structure component is the turntable.  This should be (hopefully) very cool.  Here's the rendering:


It is being printed in two main parts:  The pit, and the bridge.  The middle gantry is 3D printed although I was tempted to etch it.  We'll see how it turns out.  If that fails, I will have it etched but make a bending jig so it looks good.  There will be etched railings and it will be operable.   The prototype is en-route from Shapeways.

Stay tuned for more updates on these structure projects!  "T"ill next  time. 
-Jesse


Wednesday, October 16, 2019

In Praise of Destruction

Looking back on the last 7 years of T scale (yep, 2012..) I can't begin to count how many 3D printed models I've broken, cracked, muffed, gouged, spattered, or otherwise rendered "junk".  In this scale, especially when designing from scratch or using new techniques, there are bound to be errors.  I've learned to embrace these failures as stepping stones to better models.  Those corner braces that were too thin (oh I can replace with a bit of brass) were modified on the design and the next time they came out perfectly sound.  That time the lacquer paint was sprayed on to the 3D printed model and it never really cured brought about the coating with Future to establish an inert "base coating".  How many versions of the CCE knuckle coupler have been made?  Well pretty soon there should be another new one!  But each time the coupler gets better looking, and more functional.  Do you really want scale corrugations on that Amfleet car or does it look better with somewhat oversized ones that you can actually see?  The long story short is that as T scale model railroader, you can't be afraid of failure;  better yet, expect it and welcome the progress that invariably comes out of it.

Updates for the week:

89' flatcar:  Received the 2nd test print with "longshank" trucks.  It came out ok but still needs a little tweaking.  As you can see there was some destructive testing done;  The end platforms did warp a bit and refused to bend (but not break) after a soak in hot water.  This was not an issue on another copy with more robust supports under the model so that will be the new standard.


Amfleet coach:  This model looks ok (well the carbody and interior), but the internal bearing trucks didn't come out as intended.  Once again, modifications were made and revised models are on the way.  These acutally have 3D printed wheelsets, and it will remain to be seen how they work on the track.


Plate F boxcar:  I designed some TTX "FBOX" decals, most of which is black so not a problem on the inkjet printer.  The logo however is another matter.  It's blue and red.. Blue is dark enough to print and be mostly opaque on a yellow (TTX yellow) background.. but the red isn't .  If I tired to print in red it would come out looking orange.  What's the solution?  CMY color is the key..  Magenta and Yellow make red.  So the decal is printed in magenta for the red parts.  When applied, it looks red.


Sharonville engine shop building: I cut off the sprue, and so far-so good.  Notice how thin the window mullions are!  Some have broken but that's ok--the real one has a few patched windows as well.  There are a pair of inspection pits as well.  I hope to get going on this model in the next week or so and make a small display.  The turntable is designed but will have to wait for etched bits. which will also be needed for the C40-8 model also coming soon.


C40-8W:  Body design is done, the fuel tank, underbody and trucks are in process.

Coupler:  I got the 0.25mm square magnets, and they did indeed fit into the specially designed coupler.. with some difficulty.  However they didn't really have the pull needed to be more automatic.. I've now decided to try a more simple mechanical version.. similar to this:


- Jesse

Wednesday, October 2, 2019

Updates

Things keep moving along, so I wanted to document progress and new developments.  As always, any ideas or suggestions are greatly appreciated and if you're interested in buying anything, the product price list is at the top/right of the blog.  Email ccetrains@gmail.com.
  • Coupler:  Received prototypes and magnets, and they were a dud.  One of the components is (was) a 0.25mm cube magnet.  Now I don't mind working with small stuff, obviously, however this magnet is about the size of a grain of salt.  And I wanted to orient it by polarity, in a 1mm coupler, using steel tools... uhhh nope!  The magnet was really too weak as well.. so, I'm moving on with an alternate design.  The good old trial and error process.  I must say, in any case the "standard" articulated coupler works pretty well too, so this automatic coupler work may all be somewhat moot. 
  • Updated models:  Amfleet coach and TOFC flat car are en-route, I also redesigned the track roadbed to have slightly better detail and print more easily.
  • New models:  Decided to do the GE C40-8, it will have a choice of wide or standard cabs.  And etched brass handrails as well, and oh yes 3-axle trucks.  It's in the early stages of drafting.
  • Coalporter:  This one should be done within the week.  It's basically patterned after the Bethlehem CoalPorter, or Conrail G52 series.  It will be the 12-panel one.  Many roads had/have this rolling.
  • Sharonville EF:  Received the locomotive shop building and it looks good (this is how it comes off the printer):
     This is the prototype scene.  Now I couldn't do this scene without the turntable could I?  So that's in  development.  It will have etched brass handrails and other details and could be motorized.

Wednesday, September 25, 2019

Re-Design Update

I completely re-did the Amfleet coach to include better detail, and interior, and much improved internal bearing trucks that can be built with standard wheelsets (with the ends filed down flat) or with the included 3D printed wheelsets.  I have done this a couple time previously with "some" success but still needs to be fully vetted:  I have not run 3D printed wheelsets so can't attest to them being good for operation.  But it opens up a new page of opportunity... different wheel sizes, more accurate flanges.. etc.


I also completely re-did a 89' TOFC flatcar I had previously designed to also be better detailed and have the new/improved trucks and movable 5th Wheel Stands.  It's very much like the Bethlehem 89' flatcar used by Trailer Train in the 70's and 80's.  It has talgo style roller bearing trucks.  This is a test to see how it turns out..the first was ok, this one should be much better. 

Also working now on a 100 ft turntable.  Stay tuned!


Monday, September 23, 2019

A Couple Developments

A prototype of a new automatic version of the CCE knuckle coupler is on the way... if it (or subsequent iterations) actually work, it would allow automatic coupling and uncoupling with a hand-held tool.  It uses magnets to achieve the automation.  We shall see, but I think it has promise.

One of the downsides to this is I will need to update virtually every "kit" model I've made (which include couplers.)  I needed to do this anyway due to need for many kits to have the new roller bearing trucks added, and the updated detail on the couplers.. but wow.  I'm thinking maybe I should leave trucks and couplers off the models and just sell them separately unless they are highly specialized trucks.  I have standardized on a 1mm bolster pin for the trucks.

I revised and updated a model I never actually sold in the store..an 89' flatcar commonly used for trailer train service.  It could also be the basis for an autorack car and others.

A model of the Sharonville (Ohio) engine house, built by the New York Central and operated up into the Conrail era is on the way.  Most of it is 3D printed, but the roof will just be sheet styrene.  I'm planning to do a small diorama of the engine facility there to display models.


Friday, September 20, 2019

New Developments and Buying CCE Models

It's been a busy month or so and I apologize for not updating the blog more often!  There are several new developments with my T scale modeling and how CCE Models are offered for sale. 


Changes to CCE Knuckle Coupler and Roller Bearing Trucks:


Improved (v.2) CCE knuckle coupler.  The v.2 coupler has been enhanced to offer an articulated clasping movement, so although not automatic, it is more workable. Gently rotating the models to either side works to uncouple, and you can usually push gently together to couple.  I'm still tinkering with ways to automate this or at least allow automatic coupling.  One idea uses a very tiny metal "air hose" but that I forsee will just create more issues with catching in trackwork, etc.

The coupler also has improved detail, so it looks more accurate.  And on a related matter, since I do a lot of talgo-style trucks with couplers: I improved the look of the roller bearing trucks to have a more realistic profile and springs.


New Models:


50' Plate F Boxcars:  At the request of a Facebook T Scale group member (Michael Doll), I designed a pair of modern Plate "F" (hi cube) 50-foot boxcars.  One is a Greenbriar prototype and the other National Steel Car;  The main difference is the NSC version has horizontal outside ribs as well as the vertical ones.  These are pretty common today, and should fit onto one of the powered mechanisms if you want to add power to your trains.

PRR Signal Gantry:  After the initial proof of concept, I have refined the etched brass PRR signal bridge to have accurate bents and improved detail such as cross-bracing on the bridge.  This will be available in 5- and 4-track variants;  I may do a 2-track but I think it could be kitbashed to a 2-track without much trouble.


How to Purchase CCE Models:


As of September 2019, I no longer drop-ship through Shapeways.  I will still manufacture with Shapeways for the time being, but will ship from my stock.

There are a couple reasons for this.  Mainly, it is because I push the limits of Shapeways design parameters, so every time I add (or change) a model I have to fight them to print it.  I always must use a feature called "Print it anyway" which puts the risk of a failed print on me.  Although my designs have been 100% successful when I have used this feature, Sheapeways still doesn't allow customers to order this way.  The result is that about half the time when someone tries to order a CCE kit, Shapeways cancels it because of "thin walls" or "thin wires" in the design.

It's really frustrating and they have not been willing to do anything about it, I have decided to just sell and ship directly.  This allows me the additional ability to inspect models and ensure they are perfect before I ship.  I am also including additional details, such as etched brass handrails on certain models.  I'd like to get some more professional looking packaging as well. 


Here is the CCE Models Product List 
It's just a rudimentary list for now, but I will be enhancing it with descriptions, pictures, etc. shortly.

To order, emai your request to CCEModels@gmail.com.  I will confirm your order, manufacture and ship to you via Priority Mail.   Payment (prior to shipping) may be made via PayPal.  Shipping & Handling charge is a flat $8.00 for up to 4 kits (in USA).  I will quote shipping on anything larger or  international.  If you have any other requests, such as custom build/paint, or a custom design, just let me know.

Jesse/CCE Models

Thursday, August 15, 2019

New Products.


I wanted to share some updates.

Latest new models:

--GP38/39/-2, with etched handrails.  This model can be built with or without dynamic brakes. I made the decals myself, printed on an inkjet.


-- 2-bay and 4-bay Covered Hoppers.  The 4 bay covered hopper can be built with either grain hatches (long rectangular ones) or round hatches on top.   The 2-bay hopper pictured here features decals from CMR Products.

-- I couldn't remember if I posted pictures of the FP7 model, but here's one I did in Conrail patch paint job.  This kit allows you to build with several different variations of fuel tank skirt and nose details.  These are also CMR/Netzlof Design decals.


-- I saved the best rolling stock for last.  The GE U25B.  This features AAR-B type trucks, and etched brass handrails.  The decals are from CMR Products (and can be used on most Conrail diesels.)   Also notice the little searchlight signal I threw together on a whim.  I made this out of a piece of .03 nickle silver rod and a target from one of the etched crossing signals.  The hood is .05 tube cut in half.  The target is actually quite small--should be 2.5-3mm, however would be prototypic for a few applications like on the NYC.

Some other things I have cooked up in preparation for the Princeton Jct. module are etched brass catenary and PRR style signal gantry.  The side braces for the signal gantry need to be corrected but the catenary looks decent.  That is 0.5mm styrene square rod for the poles.


Saturday, June 15, 2019

The Case for T Scale

 Today's post is more of an editorial comment than anything else.  Below are some of my thoughts on the advantages of T scale versus other model railroad scales.  Essentially, it's a summary of  why I like modeling in 1:450, along with some thoughts on where it will go from here.  If you would like to reply and comment, please do so!  I'd like to hear from others who visit my Blog.  - Jesse

     Years ago, I picked up a copy of the charter "N Scale" magazine published by Bob Hundman (July/Aug 1989).  In it there was an editorial titled "The Case for N Scale" which outlined why N scale could be a great modeler's scale-- this was in the years before there were a multitude of highly detailed RTR models, good track, electronics, structure kits, etc. available;  Kadee's "MicroTrains Line" was a leader, and Atlas has a decent array of rolling stock.  Kato was pretty new to the scene.  Track was pretty terrible (Atlas flex), but Micro Engineering had some great flex track.  A lot of scratch building was still necessary, and detailing was nowhere near the level of today.  DCC was in it's infancy.   But you could tell N scale had potential, from the brilliance of Pete Thomas' module to the beautiful brass Shay on the back cover.  I think T scale has that same potential.  Here are my main reasons why I find T scale (1:450) a great choice for scale model railroading:

1.  You can model scenery to scale.
     Because T scale is so small, it makes faithfully scaled-down scenes possible in a reasonable amount of space.  For this reason, 1:450 is a popular scale for architects, civil engineers, and ship modelers.   At the very least, much less "selective compression" is needed to capture a scene like the prototype.  Curves can be made much broader, turnouts longer, spaces more wide open..  I'm currently planning a small diorama/module of Princeton Jct., which faithfully represents the station, full ex-PRR 4-track mainline, and a bit of the Princeton branch, in only 8x30 .. inches.  I will probably shorten the platform a bit and move a highway overpass to cut off the scene but this is still a highly accurate representation of the area.

2.  It makes modeling possible in small spaces.
     Many of us don't have large basements, garages, or even spare rooms to semi-permanently convert to train rooms.  Or, if we did we might not want to dedicate so much space to hobby use.  T scale can be modeled in the smallest of apartments, layouts carried in and out doors without hassle, niches found that can harbor models without much ado.  I do all my modeling in a corner of my kitchen in my apartment.  All my models fit on a quarter of a single shelf in a china cabinet.  Granted, it's only about 10 pieces of rolling stock, a couple structures and some dioramas but try that in HO or O..   T scale is extremely space efficient!

3.  It's a low cost scale.
     T scale is actually relatively cheap to model in.  First, because of the size of the models, any supplies go a very long way.  One Dullcote rattle lasts for scores of models.  Paints, cements, landscaping materials, scratchbuilding supplies... all last a very long time.  One small bag of ballast can do miles of track!   Yes the mechanisms and components can be comparable to other scales (ie. $40 for a locomotive mechanism) but the rest is highly cheap.  And because there is so much scratch building that also minimizes the "expensive RTR model" issue.

4.  It's a  modeler's scale.
     There is basically a tiny smattering of RTR models available in T, most are European and Japanese prototype and the lone US model (a "GP8") is an overscale, clumsy representation of the prototype.  (I'll never know why they picked the remanufactured GP8... why not just a GP7 or GP9?)   In any case, in order to have accurate North American models I have had to design and build them basically from scratch.  I employ 3D printing however I have seen other nice models made from styrene and brass bits.  I recently built a Santa Fe semaphore signal-- 0.3 brass wire, a modified bit of an etched crossing gate and a bit of 1mm styreme rod.  In other scales, there's a tendency to just buy off the shelf, ready to run models and scenic accessories..  because you can!  In T, there isn't anything like that so if you want them, you just have to make them.  I discovered this process is fundamentally rewarding.  That U25B or GG1... I didn't just assemble it, I literally created it from 3D blueprints and brought it to reality.  That process is part of the fun that I think many modelers in other scales miss out on.  You also need to hone your painting and drafting skills because there are very few decals (there weren't any until I convinced CMR Products to make T scale decals of their designs to order).. so complex paint schemes must be masked and/or hand painted. 

5.  It broadens your modeling horizons.
     Because there are so few T scale modelers in the world, the community is by necessity compressed and comprised of modelers from all corners of the globe.  Consequently, there is a very interesting and beneficial cross-pollination among modelers.  I've interacted with T scalers in the UK, Germany, Japan, China, India, Australia, New Zealand, and the USA.  The Orbost module is a landmark, Doug Kightly's amazing "Bridge", and Ewe Fenk's fantastic hand-built locomotives all have provided inspiration.  David K. Smith's models were the inspiration for my early attempts at US prototypes in T.  And since then, I've built models of the British Railways' Deltic, Class 67, Class 66, and the Victorian Railways "S" class diesels.  I built models of the RhB ABe 4/4 iii and learned about the Bernia Loop in the process.  I was generally unaware of these fantastic railroads and locomotives until I delved into T scale.

6.  The Coolness factor.
     Ok, I'll admit it.  I like being able to say "I make the smallest model trains in the world."  Or seeing eyes pop when they see how tiny these models really are.  We T scalers are definitely part of a select few.  In a sense, we're the odd bunch, the modeling purists, the tinkerers and engineers who will find a way to do things just to see if we can in 1:450 scale. 


Post Script:
     Harsh reality must be faced.  It is not a great operating scale.  I rarely even run models at all because they just don't given the light weight and track issues.  Rolling stock must still be used to push unpowered locomotives due to space limitations in the loco shells.  True, pulse transformers have helped, and have made for reasonable running at scale speeds but commercial track is still quite oversize, clumsily rendered, and oxidizes easily.  Tie size and spacing is altogether wrong for North America, and the commercial turnouts are terrible.  The coupling system is similarly awful, being oversize, not prototypic at all, and not automatic (my 3D printed ones are better but are dummy couplers).  The electric motor and drive mechanism are just a bit too large to work in hood diesels.   
     Frankly, T scale is nowhere near where N scale was in 1989 right now.. It may be closer to N scale in 1969..  My wish list is for the next 5 years is to get a manufacturer to take the plunge and make those above components and perhaps even some North American rolling stock models (although 3D printing is making rapid enough advances that rolling stock isn't such an issue for me.)  Those "infrastructure" components are the real issue if T is to gain popularity as a scale.  What a world of difference good American flex track, working #8 and #10 turnouts, and a working semi-scale knuckle coupler would be..!  Add an economical 2mm diameter 4v motor (or complete canned drive mechanism less that 3mm thick) that could be worked into the shells of hood diesels..

Well, back to the drawing board! 


Saturday, June 1, 2019

Recent Projects

I've been working a lot on finishing up some prototype models including an FP7A, GG1, and F7A.  Probably the most exciting is the GG1, which is designed to accept a custom drive mechanism designed by fellow T-scaler Joe Malinchak (Joe has also done some amazing steam engines in T-scale).  My version is a static model,but could be switched at some point;  I mainly just wanted to work out how the etched details (pantograph) worked and if I could do a respectable Amtrak paint scheme. 
The FP7 is sitting in the background;  Neither model has been weathered yet.  I also designed the catenary for a PRR installation as well as a PRR signal bridge and CPL signal heads... another project on the schedule.

Currently I'm painting up a true "classic", the ATSF "Warbonnet" passenger paint scheme on an F7A.  The F-unit was an old design I recently updated, and it's actually been updated since with louvers.  This was mainly a challenge on the decorating side because the warbonnet scheme is pretty complicated and light colors like yellow (or even a good solid red) can't be done on any color other than white.  So I masked all the colors, even the thin yellow and red striping.  The lettering and black pinstripes are inkjet decals.  I'll post pics when I finish it up.


Thursday, April 4, 2019

Etching Successes and Plans

Recently I noted I was going to have some detail items etched, and after receiving them (in a very short turn around from PPD Ltd in the UK) I think it was a success.. here are the crossbucks and handrails on the SW1200):

SO now, as the GG1 takes shape (literally) there are a host of accessories and additional scenery items needed if the big electric motor's going to reside in a prototypical world on a layout or diorama. 

First of all, the prominent pantographs are needed... Altough Eishindo makes some respectable tiny panto's, they are just too small for the GG1 motor.  I've designed some pantographs that are a one-piece etching to be folded into the diamond shape.  The upper portions of the G' had to be modified as well to accept the pantographs.

In addition there is catenary, and signalling.. The trolley wire is one thing..not sure I'm going to even try the wires.. but the poles and supports are needed.  They'd need to be somewhat sturdy, and I don't think Shapeways' FXD plastic is up to the job on that.  There would certainly be warping as well with long, thin parts.  Styrene or brass would be better;  I found some 1mm square styrene rod online, and that will serve as the poles.  The crossarms will be etched parts with insulators included.  Insulators will get a healthy coating of paint to give them depth.

There are also PRR signal gantries;  These will also use the 1mm rod for the main cross braces, but they will be sandwiched by etched lattices with tabs for mounting PRR CPL signal heads.  These will be 3D printed in the variety of styles needed.  Here's a rendering of the under-wire signal mast. 
So several projects are converging, and some interesting modeling is ahead!

Thursday, March 7, 2019

The Latest Projects aka the Back Shop

Here's a quick summary of recent developments and projects.

1.  Handrails for the GP40, GP38 (new), and SW9/SW1200 in etched stainless steel.
2.  Crossbucks, with and without warning flashers, gate arm, and with a cantilevered flasher in etched stainless.
3.  New GP38/GP39 model at Shapeways
4.  New ACF 2700 cu ft 2-bay hopper at Shapeways
5.  Improved 40' boxcar
6.  Improved 60' boxcar
7.  Modified GP40 so it can be built with or without dynamic brakes.
8.  Continued work on the GG1, which will have a powering kit available that is being developed with another modeler
9.  Testing a design for a thinner drive mechanism that will fit in the GP40
10.  Custom run of Netzlof design decals for a variety of roads is being done.
11.  AAR type "B" trucks completed, now working on a U25B shell.

Some pictures:


Saturday, February 16, 2019

Challenges and/or Jousting at Old Stations; PRR Torrence Road Station in 1:450 scale.

I live in Cincinnati, Ohio and belong to a local Facebook group for railroad enthusiasts.  We share comments and photos of local interest.  Recently a fellow posted some photos of the remnants of an old Pennsylvania Railroad station in the area--basically bits of the foundation and some concrete.   This was the Torrence Road Station, built in 1907 and closed in 1933.  The main structure has been gone for years and the site was (until recently) heavily overgrown with brush.

In the discussion I mentioned, "Wouldn't it be cool to do an augmented reality of the old station".. This way, you could experience what it used to be like.  This got me thinking .. step one is to build the 3D model.. and being the (somewhat) OCD person I am, I ventured "there goes the next 3 days..."   Sure enough I started into a project to build the station--although it actually took 4 days.

Here is the current site (Photo by Dave Rohdenberg):


Here is what the station used to look like:


Obviously a very interesting structure, but these were the only photos I could find.  I didn't even have much in the way of measurements although an old survey map was available showing some general dimensions and layout:

I started with the foundation and built it up "from scratch" using some estimates (like door height) and eyeballing proportions.  Next the main station building, and the tower were constructed.  I had to do a little guesswork on window and door placement on the trackside walls since no good photos exist.  The tower housed an elevator for taking baggage and passengers up or down to cross the tracks.

Speaking of crossing the tracks, President William Howard Taft lived a few blocks west of the station and surely travel through the station from time to time.  In fact, this is probably one reason such an ornate station was constructed at this site (his presidency was 1909-1913), and why is disappeared not long after Taft passed away.

Another interesting feature of the station is that there is a bas-relief sculpture built in to the retaining wall on the west side of the site adjacent to the tracks and under the overpass.  Here's how it looks today (D. Rohdenberg photo):


An artist named Karl bitters was commissioned to do 10 terracotta sculptures depicting the 10 largest cities the Pennsylvania RR served, to be placed at the PRR Broad St.Station in Philadephia.
When it was destroyed by fire in 1923, they gave each sculpture to the applicable city, so this came to live in Cincinnati.

Back to the model:  I kept on building up the structure, tweaking as needed.. and finally (ta da) I have this;  I'm fairly satisfied:


It seems a print on Shapeways would cost about $75 not counting "test prints" and it would probably have to be split into modules;  In addition, I would do certain details in PE like the fence, signs, etc.. But, since I don't model 1930 Pennsy I really don't have a use for any it.   So the whole project was for.. the challenge, and the fun of it!   So, if you're interested in a model please let me know because it could be made, and it could be re-scaled easily enough to Z or N as well.

-- Jesse


Friday, February 8, 2019

How to Buy Jesse's / CCE Model Kits

I have continuously striven to improve my models which typically means adding finer and more details to my 3D printed designs offered on Shapeways (CCE Models).  HOWEVER.... Shapeways is not consistent in what it will print and sometimes even the quality of printing-- although my experience has usually been positive.   I have yet to see a home-based printer that offers this quality and convenience.

Not long ago Shapeways started offering a service called "Print It Anyway" for designers who push the limits of the technology--basically shifting the risk of trying to print something very small or fine (such as 1:450 scale air horns) onto the designer.  This service is NOT offered to the general public, however.  The end result being that I, as a designer, can order models that the general public cannot.

I recently had a customer order the SW1200 model kit only to be rejected by Shapeways.  I have printed this model at least three times previously and have constructed the model successfully.  I expressed my frustration to Shapeways however they are stuck in their procedures.  My solution is to make the models myself and ship them directly to customers.

So if you want any of my models on Shapeways, just drop me an email and let me know (ccetrains@gmail.com) what you want.  I will quote you and upon approval will order them myself and re-ship to you.  I will accept payment via PayPal.  As an added service, I will also clean and primer the models, and even do custom assembly and decoration if you so desire.

Best Regards,

Jesse  


Tuesday, January 22, 2019

A Shapeways Model Start-to-Finish

I wanted to explain and illustrate my process for creating a model from a Shapeways 3D printed kit, along with some tips and hints for the new (or experienced) T-scale modeler.

Given that there are extremely limited options for modelers in T-scale to find accurate scale model trains and accessories--especially of North American/US/Canadian prototypes--I have embraced 3D printing as a means of producing my models.  As many of you know, I create and sell various T-scale items in my "CCE Models" store hosted by 3D printing service bureau Shapeways.  Shapeways is a leader in this area and their Finest Detail Plastic material is simply the highest resolution 3D printed material available on the mass-market right now.  I have been extremely impressed with their quality, service, and pricing.

My favorite railroad is the former B&O lines of the Chessie System Railroad of the 1980's.  GP40 and GP40-2 locomotives were common on the Chessie System, and so I designed a T-scale model.  It has since been improved upon several times and I sell it now as a "kit" including a choice of trucks (Blomberg B or Blomberg M), dynamic brake, horns, bells, CCE knuckle couplers, and a Chessie "signature" accessory--the rock plow pilot.  The locomotive can be built as a GP40 or a GP40-2.

Here's what the kit looks like:


The main body and components are attached to a flat base by a series of sprues.  When you get the kit from Shapeways it will be in a small poly bag, typically enclosed in bubble wrap in a large outer box.  The preparation of the model begins with a wash to remove the oily/waxy gunk left over from the printing process.  I go into detail of my washing process in a Blog post and it's also in the "Information" section of the Shapeways shop.

I separate the main shell from the base by careful cutting with a hobby knife and prep it for painting.  Here's the "raw" shell-- it's a translucent acrylic material.


I drill a small (between 0.5 -1mm) hole or two in the underside of the model at this point for a couple reasons: First, it provides a point to secure a toothpick which is used as a handle for the shell during the finishing process.  Second, the holes serve as a mounting point for the small (3/16") neodymium magnets I use to create a positive downward "pull" by the model to the tracks.  If you are going to run these models--even as unpowered dummies as this model is-- they are so light they require added weight to stay on the track.  The magnets provide artificial "weight" to the model.

After some basic clean up and sanding, the shell gets a coat or two of brushed-on Future acrylic clear floor polish, then a spray on coat of Tamiya fine surface primer.  Imperfections are much easier to see after the primer.  I sand areas that are too rough lightly between coats.  I also try not to put on too much of either the Future or primer, because there's really some great detail that you don't want to obscure--fan detail, louvers, etc.  There will likely be some layering/lines visible from the printing process but until technology improves further, I find I can live with some minor imperfection--and the models look fine from normal viewing distance.  Here's what the shell looks like after primer applied and a little sanding:


Next we are on to main assembly, detailing, finish painting and decaling of the main shell.  But of course--I always do research on the prototype before this.  In fact, research is one of my favorite activities.  In this case I am modeling Chessie/B&O GP40-2 "GM50" which was a unique paint scheme to honor the 50th Anniversary of GM's ElectroMotive Division, the locomotive manufacturing arm of General Motors.  The internet has tons of reference material, just type in your subject in any search engine and you will likely get a ton of hits.  I found this picture as it shows a lot of details, the color scheme, and placement of lettering.

Notice this unit has dynamic brakes--evidenced by the bulge above the "Chessie" and extra roof fan.  The kit has the option to build the GP40-2 with dynamic brake or without.  You will want to add these on now if you didn't before, as well as any other major components such as the rock plow (although on this build I forgot until later).  I use regular ACC to attach such items.

On to the subject of lettering and decals:  There just are not many choices for decals in T-scale.  At my request, CMR Products has been great about reducing their line of decals by Netzlof Design to 1:450.  You can order them upon request (and you can even select 1:450 on the website now).  Even better, they are also working with me now to custom design some other new decals for Chessie and Conrail and N&W in 1:450 scale.

The GM50 wasn't one of these available at CMR--I designed and printed these myself on my trusty inkjet printer.  In fact, most dark color lettering can be adequately produced on store-bought clear decal film for inkjets.  Lighter colors/whites are basically impossible at this point as inkjets use the "white" of the paper or background, not a white ink.  Blacks/Blues/Greens are typically opaque enough.  The Chessie lettering is (technically) a very dark blue, but I use black because it really looks like black.  My design work and printing is done with PhotoScape software, but there are many options.  I just create a .jpg file--no need for ultra precision because these are reduced to such small size that it makes up for minor imperfections.  Here's the GM50 decal image file, which you can use if you like;  and technically there should be two of the 50th anniversary logos, one goes on the rear of the locomotive as well:

It takes some tweaking to get the size and printout quality correct--I print drafts on a sheet of plain white paper until I get the correct size, then do a "run" of 5-6 sets on the decal film paper (usually a single line across).   I trim off  the strip of decals then save the rest of the paper for another project.  I find there will be at least a few smudges or bad printing on each set--about a 75% ratio, so I always print extra sets.  Of great importance, after printing, the decals must be sealed before using--I use Krylon Crystal Clear acrylic coating (#1303).   Here's what they look like when printed and sealed.


Finally we are ready for finish painting.  The base color is Tamiya gold--it's actually a very simple scheme.  Here's the shell with it's gold paint applied two light coats.  It's starting to look solid!  (Pardon the pun..)

Once the finish coat is on you can apply the decals and it will start to look like it should!


It's coming together, but we still need to add couplers, trucks, and finishing details.

Since I forgot to add the Rock Plow pilot earlier, I trimmed off the footboards and added them now to the front and rear pilots.

Add the couplers.  CCE #3 couplers will pivot freely about 45 degrees left and right, but must be gently snapped free from a tiny pin inside the draft gear.  I did a short YouTube video showing how to do this.  Once working, slide the draft ear into the slot in the pilot.  They should fit snugly with just a press-fit.  I usually secure with a tiny bit of Future or MicroScale Krystal Klear.  This is because it's water soluble and if I ever need to remove the coupler it can be loosened and removed.  ACC wouldn't work because it would be stuck-tight!

Underneath the model, there are pilot holes for the trucks.  Drill these out with a .75-.80 mm bit--the trucks are designed to be secured with a 1mm screw.  I get my screws on Amazon and are sold in bulk for eyeglasses etc for a few dollars.  You can add the TGauge.com pin-point wheelsets before or after mounting the trucks.   I used the Blomberg "B" style trucks to suit the prototype.

I add the neodymium magnets at this point, and secure with a bit of Krystal Klear.  I have many uses for this water-soluble clear goop!  I hold them in place with a bit of tape until it dries.


Paint the trucks and couplers--gold for the trucks and I use Roof Brown for the couplers.  The final step is to add the miniscule horn.  I pre-painted it on the sprue and added it to a small hole in the cab roof.  I put to in the kit for a reason--I destroyed the first one.  As a finishing touch, I use Krytal Klear for small windows like the door and windshield, and use decal film for the cab side windows.  You can apply weathering at this point although this unit was special so please keep it light!