CCE Models Update: After many months of "ho hum" traffic at the CCE Models website, I decided to just take it down. This isn't necessarily a permanent thing. However the site was just not generating revenue to the level needed. In the meantime, I have gone back to an ad-hoc style of selling, and may move to wholesale. I may also start going to train shows and selling there. In the meantime, if you're looking for something from my line of models, email me and ask about it.
All that being said, I'm rather excited about the new White Pass & Yukon M-scale (1:300) models under development (see below), and there very well may be a decent market for them.
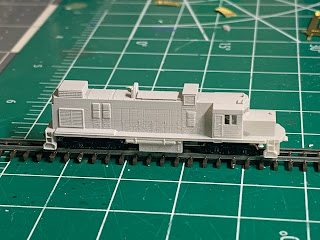
WP&Y Rolling Stock: The bulk of my time over the last few months has been spent developing 1:300 scale White Pass & Yukon RR equipment. There are two main items: an MLW DL535E locomotive, and a 45-foot coach.
The DL535E has gone through several iterations to ensure it fits on a chassis and is functional. The good news is it works, the bad news is the powered 6-axle chassis must be split in order to achieve correct truck spacing. It really isn't too complex a modification, but testing still remains. The DL535E is also designed to accept an LED headlight, and of course etched handrails are on the way. I'm also considering making a semi-permanently coupled set of these with power continuity through the lash-up, a la prototype MU connections.
The 45-foot coach incorporates a new design innovation, as it uses etched brass sides on a 3D printed core. Here's the overall design:
Test Layout: A 2x4 foot module is being used to construct a T-gauge test loop. Well..it's actually more than just a test loop; One side will be a scenic WP&Y diorama, with a high rock wall, a short bridge, and a snow slide, representing a section of the railroad climbing out of Skagway, Alaska. This will give me a chance to practice my scenery techniques. The other side will be standard gauge, but I have not decided on any theme just yet.
The track on the test layout is being constructed with an experimental technique using Duck-Tape brand cork roll. This product is 1mm thick and comes in rolls approximately 45mm wide. I cut it in 3mm-wide strips; curves were simply cut out to the correct radius because it does not bend sideways. The cork strip is then attached to the foam base with carpenter's glue, peel-off adhesive-side up. Once the glue dries, track can be stuck to the cork after peeling off the protective strip, after which painting and ballasting. It's cheap and not difficult and seems to work. Here's a test section "before and after".
While contemplating making some rock castings, I discovered some great "rubber rocks" available from Cripplebush Valley Models . I decided to try them, and so far I am very impressed. So much easier than carving or casting rocks in plaster!!
3D Printer: The pre-ordered printer still has not been delivered, but they are shipping as was confirmed by a friend who has received his. I'm still waiting but in the meantime I picked up a cleaning/curing vat and some "Mean Green" cleaner to clean on the (hopefully) soon to come prints.
Narrow Body Worm Drive: More testing was done on the GP38
prototype and some new etched parts for power pickup are on the way.
Once the GP is proven there are a host of locomotives I'm dying to get
under power.
Well that's the latest and greatest, reach out to me if you have any questions. And until next time, keep on modeling!
-Jesse

.stl.png) E
E


