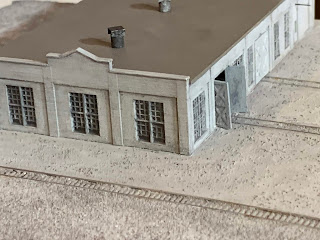
Sharonville Engine House Diorama:
The engine house is installed on the base, ballast laid, and basic weathering done. I used trusty DAS modeling clay to set the engine house and turntable pit into the base.
I used a blend of fine grout for the ballast, with liberal application of chalk powders (light gray, white, brown) to blend it.
The turntable has been painted and test installed--looks rather "new" as it is not weathered yet.
Windows were installed on the engine house using MicroScale Krystal Klear. I need to paint over a bunch of the panes as the prototype has about 20% broken out/replaced with wood. The doors (open ones) had to be sanded down to thin them a little. So far, I'm pretty happy with how it's turning out.
Moving from the model to the prototype, here's a picture I took in Sharonville in the late 90's after the engine house was razed. The building would've been on the left-hand side of the picture where the shed is. Turntable is still there, on the left, but just outside of the picture. There's still a nice assortment of Conrail (and early CSX) locomotives on the pad.
1:300 Narrow Gauge Project:
Several items are in process right now.
The K-36 is progressing, I had a test model made of the locomotive to test my assembly concept (frame attaching to boiler) and also how much detail could be printed on the model.
I got some answers--some of the finest detail didn't make it, but nothing I can't work around. For example, the number boards and bits of the air compressor didn't make it, but the headlight did (although I later broke it off in cleaning). This is how the process goes and I'll revise the model to take it into account this either by simply omitting the part, beefing it up, or making them as add-on parts.
My biggest dilemma now is how to get the counterweights and rods animated.. I'm not sure it's going to be possible on the first "real" version. The tender is almost completed as well. Here's how it looks on the rails, next to the first iteration of the 30' boxcar:
And a rendering with the tender.
I also designed a #8 dummy turnout base to go with the TGauge.com "Wider Sleeper Flexitrack" which is the 1:300 3-foot gauge track. It's a dummy because the mechanism would be too complicated for now, and I just wanted something to visually approximate a turnout on a "roundy round" type layout. In theory, I could do nearly any type of turnout-- wye, three-way, etc. in the same way. "One of these days" I'll think about making a working one.. when the mechanisms catch up.
Here's how it looks before rail is installed:
Next comes the rail:
And with paint:
Other Stuff:
A T-scaler out of Canada requested some Canadian prototype equipment. Some may need to be done from scratch, but he mentioned the GP40-2W.. since I already have a GP40-2 I thought, okie dokie! Here's the rendering, and next time I should have a first iteration model to show ya.
Until next time, stay safe and stay healthy!
-Jesse


No comments:
Post a Comment
Please feel free to add comments but the best way to ensure I see them promptly is to email me directly at ccetrains@gmail.com