Tuesday, September 27, 2022

Late September T-Scale Mega Update

 It's time for an update on my T-gauge antics!  Despite the "summer fun" I have been very busy.  Let's see.. where to start.

3D Printer:  The 3D printer (a Phrozen Sonic Mini 8K) has turned out to be one of the best investments I have made in this hobby.  After years of slow turn-around, fragile parts, and not-so-great resolution using Shapeways, this printer is absolutely the shizzle.  I have done a host of projects since the test pieces previously discussed.  Most importantly, I'm becoming pretty familiar with the materials and settings needed to create good models.  The new SLA resins for the 3D printer were first tested and put to use on the parts Shapeways FUD material was most ill-suited for:  Trucks and couplers.  A series of tests of my existing designs of roller bearing, Bettendorf, narrow gauge passenger trucks proved the new materials--particularly one called TGM-7--was ideal for these parts. It's tough, somewhat flexible, and very detailed.   The couplers were next, and I made some tweaks to improve them while I was at it.  The coupler and shank can now be replaced in the draft gear.  The result is the CCE MkIV coupler, really the best so far.  Note: the old CCE couplers are still compatible, but are really fragile.

T Scale Narrow Body (GP38) Chassis:  Priorities... One of the issues getting the GP38 finalized has been the trucks (bogies for you non-Americans).  The trucks need to be able to reliably conduct electricity from the rails to the motor while also being able to transmit tractive effort from the drive to the rails.  The original bogie design is actually ingenious at doing this, despite those difficult to manage springs.  I had been trying to invent a new design using wipers and dispensing with the springs, with some success.  But I never got it accomplished reliably;  One issue with the process is that etching new metal parts (wipers/contacts) required a months-long turn-around for each iteration.  In the end, I decided in the name of speed I would just adapt the standard truck design to work with the narrow chassis.  The hitch had been the non-prototypical sideframes (the KIHA design).  Some find that acceptable but it wasn't good enough for me;  My practice has been to sand down the sideframes and glue on Blomberg sideframes.  Well, even that wasn't good enough, so I designed Blomberg trucks that accept the TGauge contacts and wheelsets.  This was no simple feat, and took a multitude of iterations to get right, but it's done.  So, using these new Blomberg trucks, what was the first "complete" locomotive to be?   Not a GP38, that can wait.

New and Improved FP7 (or FP9):  The actual EMD FP7 truck-center spacing closely matches the spacing on the stock 35mm chassis, and I had previously designed a shell to fit it.  This shell wasn't as detailed as my more recent models, but it's such an "easy" adaptation that I figured that this update would be the first CCE model to get the new Blomberg trucks.  This actually turned into a rather large project over the course of weeks.  I updated the design and details, and even made several versions based on the detailing variations for different roads:

  • Pennsylvania RR (as built with Trainfone antenna)
  • PRR and Penn Central (late with no antenna and cut-away skirts)
  • Milwaukee Road
  • Chesapeake & Ohio (later B&O)
  • Seaboard Cost Line
  • Canadian National (FP9) 

Another cool thing is I added capability for a 0402 LED for lighting.  And while the shell has a large cut-out in the pilot for the stock coupler, there's also an insert for those who want the better appearance of the MkIV coupler.  There's even a semi-scale coupler (non functional) coupler.

Above is the FP7 using the standard chassis, LED adapter and LED installed, and MkIV coupler and pilot insert.  

Here it is running (sound effect added--it doesn't have sound.. yet!): 


Below is the CN FP9 body shell.


I'm planning on making several kits (FP7 shell, trucks, LED and pilot adapters, couplers and decals) available through TGauge.com by later this fall (November 2022).  An RTR version may be available soon as well.  Stay tuned!

DL535E Update: While we're talking about locomotives, check out the last prototype of the DL535E.  This rides on a stock 6-axle chassis, with 3D printed Tri-mount sideframes added, and brass side handrails.  End handrails and the body are 3D printed.  I have decals but have not gotten around to paint and decals yet.  There are special elongated MkIV couplers for the model as well.


WP&Y Layout Update:  The layout has been progressing and track has finally been laid to complete the loop.  In the course of doing this I have developed a way to improve the appearance of the TGauge track.  This is the "wider sleeper flextrack".  Here are the steps to get track laid prior to painting/ballasting:

1. Using a heavy blade, remove the large nail adapters by snipping the web under the rail on both sides, flush with the adjacent tie:

2. Clean up the ties with a fine knife:
3.  Connect flextrack with joiners or adapters, and use T-pins and thumbtacks to hold in place.
4. Apply 50-50 water-carpenters glue to affix. At this point I will also slide in extra ties under the joints or wherever else is needed.
Here's how the rail looks when painted.


Curves: Either use plain joiners and solder joints or use the provided connector adapters;  I have done both and given the nature of the rail (it is stiff and wants to twist) there's no perfect solution, yet.  The adapters need to be cleaned up themselves--I snip the end ties off then drill out the web between the ties and clean it up with a sharp knife.  I then use lots of T-pins to hold the joint and curve in place.  Soldering is tough because the ties melt pretty easily.  I really wish there was longer strips of flex track.. and I may try 3D printing some lengths of tie strips for the longer Code 40 rail.  Added bonus: 3D printed ties are also much more heat resistant and withstand soldering much better.

Oh did you notice the small structure in the previous picture?  That's my model of the enclosed water tank/station/section house on the WP&Y in Fraser BC.  This scene will be the flip side of the small layout.  This was just a 2nd iteration prototype, the final will be very slightly different.


 Whew.  Well there were a few other small projects but they can wait.  In the meantime please feel free to contact me if you have any questions or comments.  - Jesse


Saturday, June 4, 2022

Is It Summer Yet?

Many modelers seem to get much more into the hobby in winter, as they stay in the warmth and get their modeling jobs done uninterrupted by grass cutting, vacations, and the like.  I'm a bit of the opposite as I really detest hot, muggy weather (in southwest Ohio), and live in a condo where there's essentially no yard maintenance required, so find myself just as busy--if not more so--in the summertime.  And it looks like a busy summer is in store!  Here are some updates on various T-gauge projects.

T Scale Narrow Body Drive/GP38 Chassis:  This project has been on the back-burner with the iterative delays with etching and 3D printing cycle time.  The narrow-body motor+worm gear drive train has been proven (at least a few iterations), but the the bogies remain a stubborn issue.  My stubborn insistence on a decent-looking Blomberg truck and refusal to use the damned tension springs has lead to several different approaches.  I designed and tested a bogie that is all 3D printed plastic, with contact strips etched from brass, but they were not strong enough.  I'm currently testing a combination of metal sideframe + plastic 3D printed parts.   However, the new resin 3D printer (see below) will be useful in this effort as well--I have already revised the one-piece bogie that will accept "wiper" contact strips on the drawing board and it's far stronger than the previous version.  

M Scale White Pass & Yukon Layout:   Several projects are underway in this category, lead by the WP&Y test layout , which is starting to really take shape.  The layout is divided into two halves, separated by a scenic divider.  One side will be a representation of the first several miles of mainline track climbing along the Skagway River, the opposite I am thinking I will do a version of the Skagway Shops.  The mainline side has basic landforms in place, primarily the sheer cliffs the ROW was carved into around mile 7.  I'm using rubber rocks from Cripplebush Valley Models and I must say I really like them.  

Bridge 7B will span the small gully in front of the rock face.  While scratch-building from styrene is an option, I decided to 3D print this (Shapeways).  The bridge track has closer-spaced ties, so I cut the web off a section of ties, slid them closer, and glued some cut styrene ties into the gaps.  This will represent a section of bridge ties.  Here's the whole assembly, including the cast retaining wall with steel beam reinforcement, and abutments.  The base will come off prior to installation.

Since track laying is coming soon, I started thinking of practical issues, one of which is electrical pickup.  There are connectors made for the TGauge flex track sections that I have modified to have power feeders, by soldering wire through the back on to the rail joiner.
I'm also modifying the track by removing the cast-on nail holes, which I won't be needing since I intend to glue down the track;  This is really just for aesthetics and to let the ballast fill the gaps.

M Scale Narrow Gauge Coach: The WP&Y/C&S/D&RGW coach prototype is finished, and I'm quite happy with the result.  It uses a 3D printed core with etched brass sides.  The sides have 1/2 etch and the truss rods added, all of which turned out very nicely.  I have several other shells/sides on the workbench, with varying designs of sides.  I'm contemplating a Combine as well.  Here's the sequence from design to finished model:


One other note, take a look at those pine trees.  These are the best small pine trees I've found and are from an Ebay seller Sky and Landscape.  Remember this is 1:300 scale.  Highly recommended!

WP&Y In Person:  In early May I was able to take a "prototype reference visit" to Skagway, Alaska and was able to check out the WP&Y in person.  I highly recommend a visit to anyone:  The area is beautiful, the town is fun, and there are enough activities to keep you busy for days.  Visit the Red Onion and Skagway Brewing Co.!   Of course I rode the WP&Y train to the summit and return, and it was absolutely spectacular.  I was also lucky to catch one of the DL535Es still running, although they have been relegated to yard service now, with the arrival of several new NRE locomotives.  Hmm.. might have to design one of those new beasties!

 
Skagway locomotive shop buildings with a set of GE "Shovel Nose" Class 90 diesels and a pair of MLW DL535E diesels posed in front.  May 2022.

 
A pair of brand-new NRE E3000CC-DCs on a MOW stone train at Skagway Shops, May 2022. 

3D Printer In Da House:  After years of using Shapeways (and still intend to for some materials) I finally pulled the trigger and put down several $hundred on a resin SLA 3D printer.  I opted for the Phrozen Sonic Mini 8k, which offers 20um x 22um x 22um resolution.  I also purchased a UV curing and washing machine to expedite production.  To date, I have only done calibration prints and one test print (an E8A seen below) but so far am extremely happy with the results.  I set up the printer by my spray booth and run the exhaust fan to vent the fumes--which really aren't that bad anyway TBH.  Resolution exceeds Shapeways Smoothest Fine Detail Plastic material and is stronger, and it takes about an hour for a typical print (not counting post-processing.. clean, clean, clean!).  I look forward to more of that rapid turn around (SW is usually a couple weeks at best) and finer material.  I still have a bit of a learning curve to optimize my designs for resin SLA printing--mainly things like supports--but so far I am extremely happy.  I may even have to start adding rivets to some of these models!


Until next time, enjoy the summer and happy T-Gauge Modeling!  - Jesse


Monday, April 18, 2022

Springing into Spring

CCE Models Update:  After many months of "ho hum" traffic at the CCE Models website, I decided to just take it down.  This isn't necessarily a permanent thing. However the site was just not generating revenue to the level needed.  In the meantime, I have gone back to an ad-hoc style of selling, and may move to wholesale.  I may also start going to train shows and selling there.  In the meantime, if you're looking for something from my line of models, email me and ask about it.  

All that being said, I'm rather excited about the new White Pass & Yukon M-scale (1:300) models under development (see below), and there very well may be a decent market for them. 

WP&Y Rolling Stock:  The bulk of my time over the last few months has been spent developing 1:300 scale White Pass & Yukon RR equipment.  There are two main items:  an MLW DL535E locomotive, and a 45-foot coach.

The DL535E has gone through several iterations to ensure it fits on a chassis and is functional.  The good news is it works, the bad news is the powered 6-axle chassis must be split in order to achieve correct truck spacing.  It really isn't too complex a modification, but testing still remains.  The DL535E is also designed to accept an LED headlight, and of course etched handrails are on the way.  I'm also considering making a semi-permanently coupled set of these with power continuity through the lash-up, a la prototype MU connections.


The 45-foot coach incorporates a new design innovation, as it uses etched brass sides on a 3D printed core.  Here's the overall design: 

...and the test 3D printed core, awaiting it's etched sides:


En route are sides for a WP&Y chair car (coach) and Colorado & Southern coach.  This technique lends itself to T-gauge projects of various scales, and I can envision some other passenger cars or even structures. 

Decals for all of the above are also in production.

Test Layout:  A 2x4 foot module is being used to construct a T-gauge test loop.  Well..it's actually more than just a test loop; One side will be a scenic WP&Y diorama, with a high rock wall, a short bridge, and a snow slide, representing a section of the railroad climbing out of Skagway, Alaska.  This will give me a chance to practice my scenery techniques.  The other side will be standard gauge, but I have not decided on any theme just yet.  


The track on the test layout is being constructed with an experimental technique using Duck-Tape brand cork roll.  This product is 1mm thick and comes in rolls approximately 45mm wide.   I cut it in 3mm-wide strips; curves were simply cut out to the correct radius because it does not bend sideways.  The cork strip is then attached to the foam base with carpenter's glue, peel-off adhesive-side up.  Once the glue dries, track can be stuck to the cork after peeling off the protective strip, after which painting and ballasting.  It's cheap and not difficult and seems to work.  Here's a test section "before and after".


While contemplating making some rock castings, I discovered some great "rubber rocks" available from Cripplebush Valley Models .  I decided to try them, and so far I am very impressed.  So much easier than carving or casting rocks in plaster!!


3D Printer:  The pre-ordered printer still has not been delivered, but they are shipping as was confirmed by a friend who has received his.  I'm still waiting but in the meantime I picked up a cleaning/curing vat and some "Mean Green" cleaner to clean on the (hopefully) soon to come prints.

Narrow Body Worm Drive:  More testing was done on the GP38 prototype and some new etched parts for power pickup are on the way.  Once the GP is proven there are a host of locomotives I'm dying to get under power.

Well that's the latest and greatest, reach out to me if you have any questions.  And until next time, keep on modeling!

-Jesse

Thursday, February 3, 2022

Welcome to the New Year

The new year is underway and several old and new projects are underway in the CCE Models workshop.  As we hunker down in the cold short days working on models, listening to some music is always good, but I find watching live streams like Virtual Railfan or Railstream a great background for my modeling or design work.

89' Autoracks  I designed decal sets for AT&SF, Conrail, and Chessie (C&O/B&O/WM) and two test models.  Here's the completed model decorated in the ATSF scheme.  Look for these and the racks/PE on the website.

50' Plate F Boxcar  Here's the completed model with the photoetched door and decals in place.  Again, the PE adds a level of crispness not found in the 3D printed model.  I'm quite happy with how this turned out.


For the fans of British railways:  A test decal set of decals for Freightliner HIA hopper has been made in cooperation with TGauge.com.  Look for more news from them at some point soon.  


I also refreshed and updated the Class 55 shell with better decals and updated the sideframes. 

Having received a few of the new 6-axle powered chassis I was able to produce fully-powered test model with the new decals.


M Scale / 1:300 Narrow Gauge Development:  As you will recall, I found the T-gauge mechanisms and track (wider spacing sleepers) perfect for 1:300 scale 3-foot narrow gauge.  I call it "M scale".  With the release of the new 6-axle powered mechanism, I am now planning a fully powered 6-axle diesel, the Alco DL535E.  This was used on the White Pass & Yukon Railroad as well as the current Durango & Silverton Scenic RR.

Layout Work:  I am in possession of two 2'x4' FreeMo style module kits.  At least one will be devoted to a T-gauge layout.  I haven't decided if it will just be a test-bed or a full layout.  I do have some structures I designed for Princeton Jct. I'd like to test..  Hmm maybe a loop with one side with scenery and a divider between?  

3D Printing:  I have used Shapeways for my 3D printing for many years--they have had excellent resolution printing and reasonable prices.  I held off on the various resin "home" printers for various reasons.  However--it was bound to happen--I have just reserved a new high-resolution mSLA printer which should arrive this spring.  While there will be a learning curve certainly, I'm looking forward to a more rapid turn-around on models though and pushing the limits.. as always!


Stay warm and Happy New Year to everyone, and feel free to email me with any questions.

-Jesse


Thursday, October 21, 2021

Back to Work at the Car Shop

After moving, and all the chaos and chores associated, it's been a little hard to re-establish the routine of working on T scale.  I finally got my work area organized along with the addition of a few new tools and organizational improvements.  A giant cutting mat from Fiskars is a really nice addition.  A new airbrush was acquired, a Badger 105, aka "the Patriot".  It supplants the old cheap Chinese Iwata knock-off, and a very nice deal from Midwest Model Railroad Supply gets you the airbrush plus a set of Badger acrylic RR colors and an undec HO car to practice on for less than $100.  In my case it was an HO Athearn Genesis 60' boxcar.   I have been contemplating an HO micro-layout to balance out the T-scale stuff, so maybe this will get me started..   The really nice thing is I have more storage space and much better organization (thank you Ikea) in the new workshop.  To cut to the chase, I am back to working on my T-scale models! 

The first order of business has been getting the prototype of the 89' autorack done.  The etch for the side/roof wrap finally arrived along with many N-scale signal bridges and a new 12-foot plug door for the 50' Plate F boxcar.  The autorack wrap worked out essentially perfect!  It comes in three pieces-- a roof and two sides.  It was assembled by first placing the unfolded etch of the roof face-down on the workbench, then gluing the top section of the roof in place being very careful to center it properly.  Once the glue on the top section was dry, each side was carefully folded onto the angled side of the roof by bending the body sideways.  The sides were then glued in place. 

The body is hollow, so I added a bit of weight and assembled the frame/trucks.  Note, since the body is hollow it has potential to be a powered car.  For painting, I gave it a shot of primer from the rattle can (Tamiya Fine Primer), then masked the ends and frame and gave it a shot of Tamiya Bare Metal Silver (again rattle can) to see how it looks. The overall impression is exactly what I hoped for! 

I'm now working on decal sets, which will include decals for the side posts--too small to hand-paint in my opinion.  So far, I have a Santa Fe, Conrail, and Chessie set on the way--feel free to let me know any suggested roads.  

I also prototyped the 12' etched plug door on the 50' Plate F boxcar.  This is assembled on the 3D printed body (designed for the door) by gluing in place, then adding 9.5mm segments of  0.15mm rod for the pivot rods.  Here's the body shot with oxide red primer.  The detailing much smoother than the plain 3D printed doors.  I think this one will get a BN scheme..


  Anyway, that's the update for now, so until next time happy modeling!


Monday, August 30, 2021

Late Summer Update

It's been a busy summer for me in many ways other than T-scale modeling.  I must apologize for the sparse posts, but rest assured, my enthusiasm for tiny trains has not waned.  I volunteered myself for an N-scale project involving the design and production of PRR signal bridges and CPL signals which grew to be a very large time consumer;  I also designed a custom 1:72 scale A-20 "Havoc" decal set for my other modeling favorite, aircraft kits;  And on top of that I relocated my primary residence.  The dust has settled a bit and now getting back to some fun with T-scale!

Following is a brief update on a couple projects that will be materializing in the next month or two, and some recently completed models.

Powered Mechanism:  Slowly progressing on this.  The main mechanism is pretty well done, fits easily into the GP40 shell, however getting the powered trucks attached with decent electrical contact is the present challenge.  Since some of the parts needed are etched, and etching lead time is at least a month, this tends to slow things down.  Given that the first design is nearly always a test and requires revision and a new test, you can see how this takes a lot of time.

89' Autorack:  Using my ever improving etching skills, I decided to give a try at an autorack using etched metal for the body panels.  I designed it to wrap around a 3D printed car body.  In fact, the 3D printed body looks pretty good all by itself and could, in my estimation, with paint and decals, make a pretty good representation of an autorack without the etch.  


 None the less, the etched corrugated panels are in transit (along with the aforementioned contact strips for the mechanism) so we shall see how it turns out.

More Plugs:  Since the double plug door for the 86' hi-cube boxcar turned out so well, I decided to make a 12' plug door to fit the Plate F boxcar.  

Graffiti Decals:  To give model representation to some of the amazing art that adorns modern freight cars, I gave a shot at some decals in T (and N) scale.  Of course Itchy and Scratchy -- the classic Simpson's cartoon characters-- had to be represented!

Here's the prototype:


And the T-gauge model: 

Another recently finished model, the Canadian Grain Board cylindrical hopper.  This utilizes etched brass for the ends, and turned out very nicely in my opinion.  These are available at the CCE Models website:


Ok, that's all for now.  Look for more frequent updates in the upcoming weeks and months.  - Jesse


Thursday, June 10, 2021

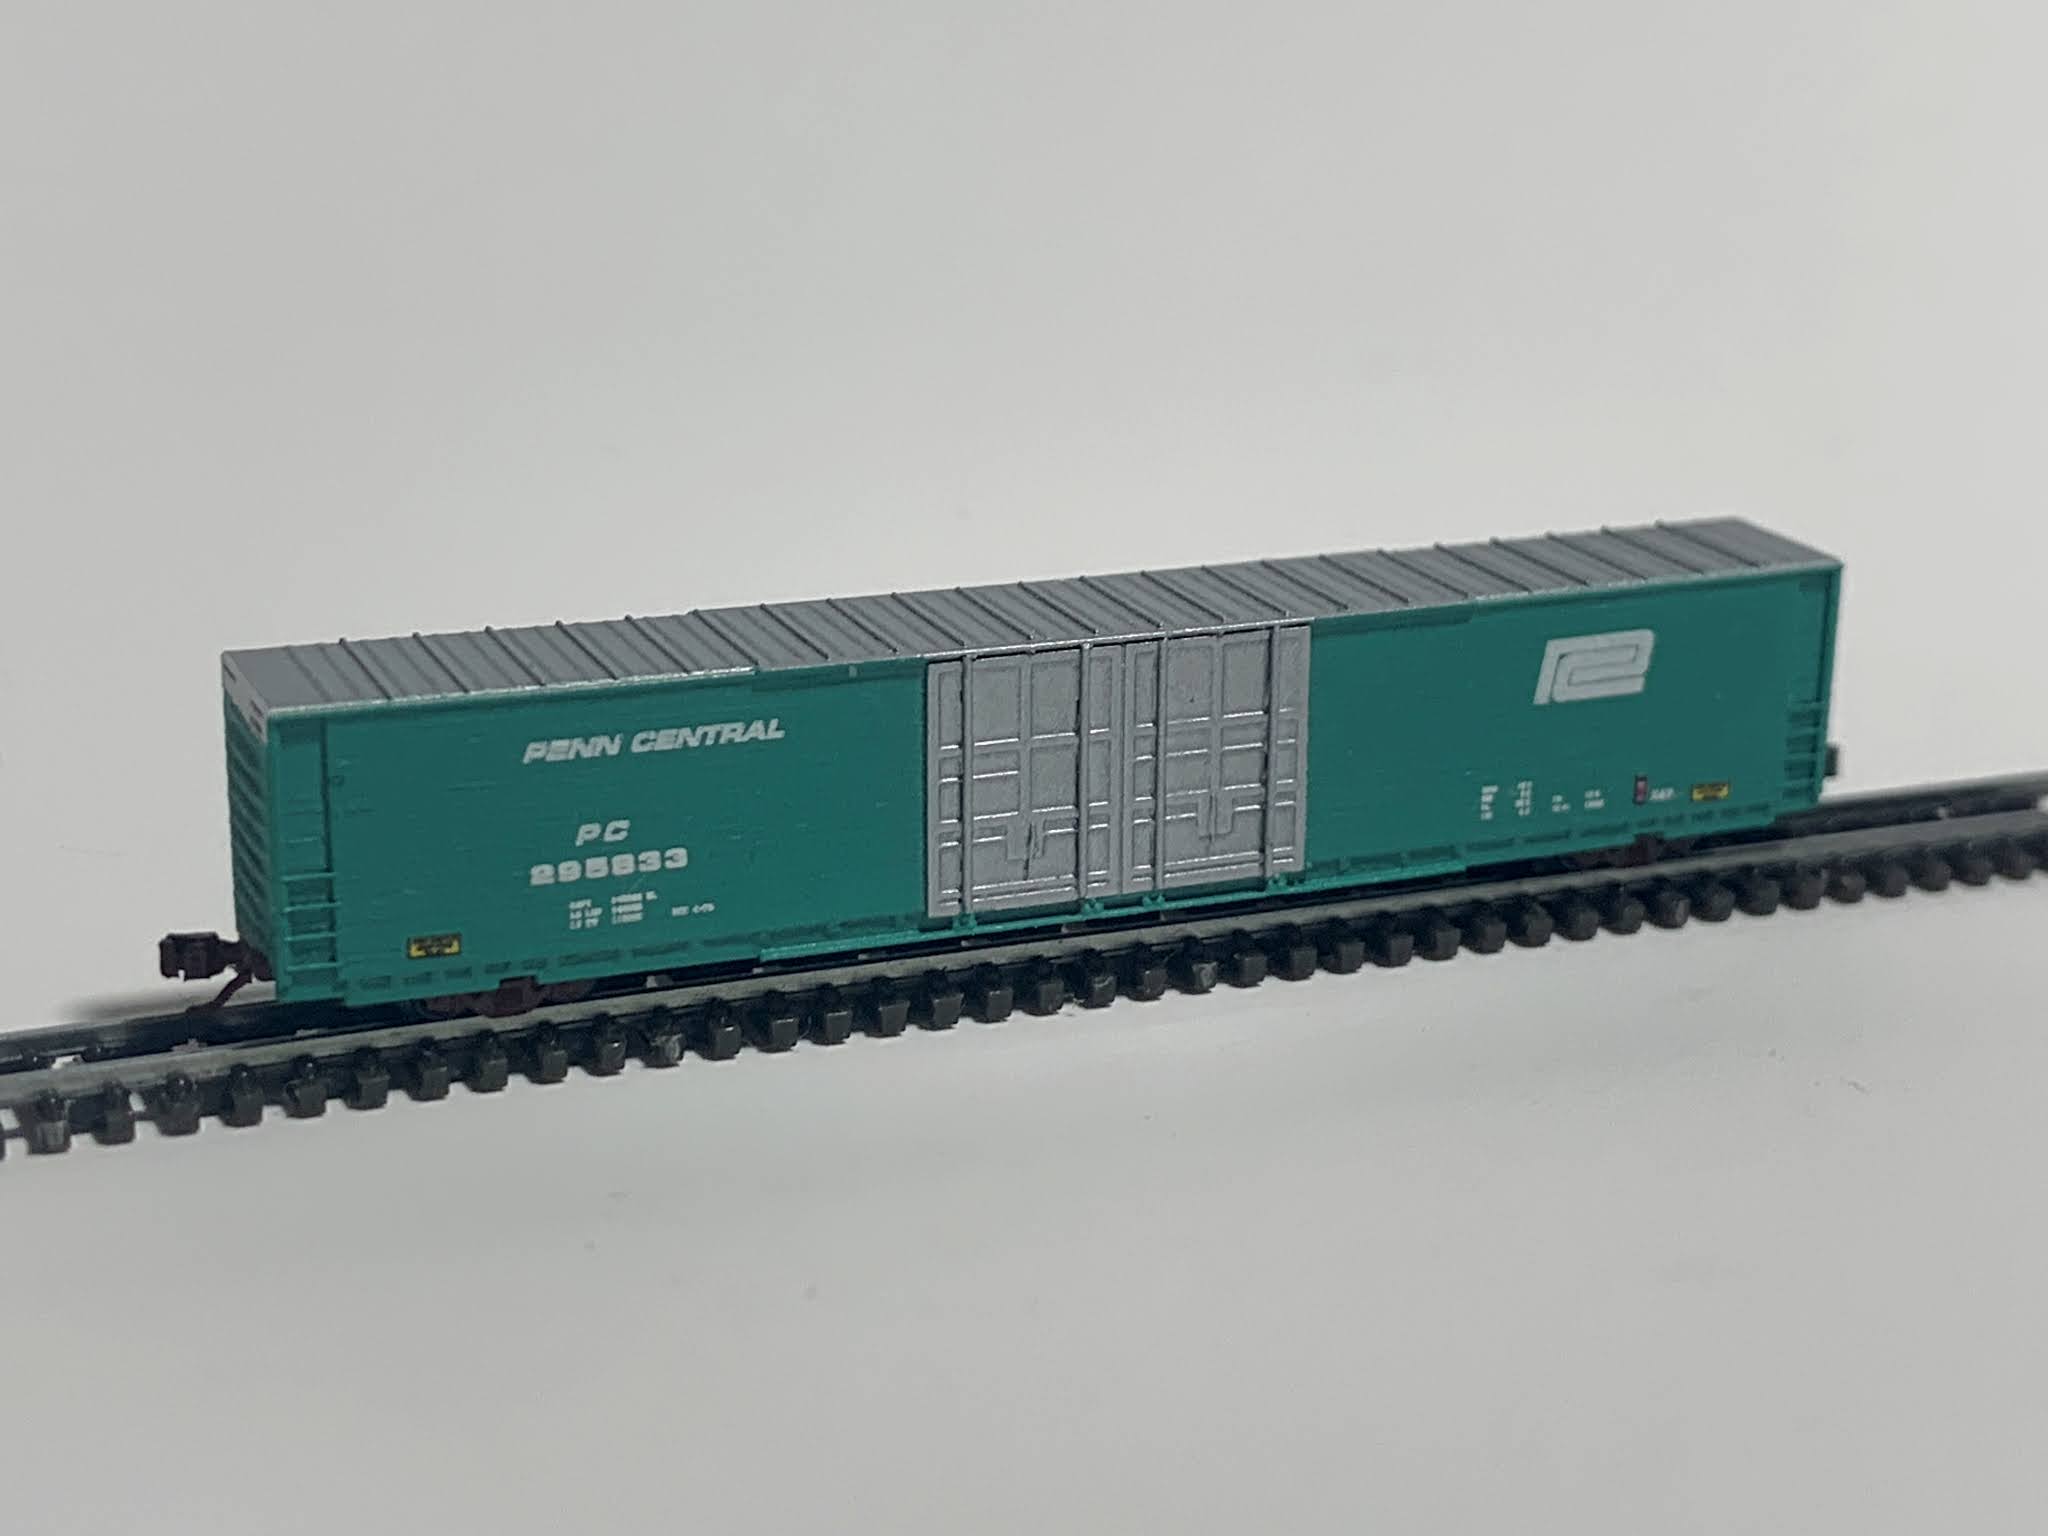
Build Walk-Through: 1:450 Scale Penn Central X67 Class Boxcar

Last summer, the Conrail Historical Society magazine featured a series of articles about the Penn Central (and later Conrail and CSXT) X67 class of hi-cube boxcars used to transport auto parts.  I had been wanting to make a hi-cube boxcar for CCE Models and this excellent issue spurred me into action.  

Along with a history of the car, the article had drawings and dimensional data which I used (along with several reference photos) to design a 3D model.  A test model turned out pretty nice, except the doors were a bit of a sore spot.  Due to the small features such as the door rods, locking bar, etc. the 3D printing process made the doors look rough.  I had been thinking about trying to make boxcar doors of photoetch brass, so here was my opportunity to test this approach.  I adjusted the model design to omit the doors, and did the artwork for a photoetch double plug-door.  A few weeks later I had my PE frets and was in business!  

 Here's a step-by-step summary of the build of the CCE Models 86' Hi-Cube Boxcar (PC class X67):

Step one is to clean the model and prime it.  I gave the boxcar and the PE fret a shot of my go-to primer, Tamiya Fine Surface Primer (gray).

Next, I test fit and applied the PE door to the model using some Microscale Krystal Klear.

 
The door still needs the separate door rods (although you could omit them if you don't mind the lack of detail);  I cut the four door rods from 0.15mm brass wire to a length of 9.0 mm.  The door rods were applied using the small depressions in the door to align them properly and secured with a bit of thinned Krystal Klear.  
 

Once the doors and the end brake wheel (also included on the PE fret) were applied, another coat of Tamiya gray primer was applied.  This also helps seal the details to the model.

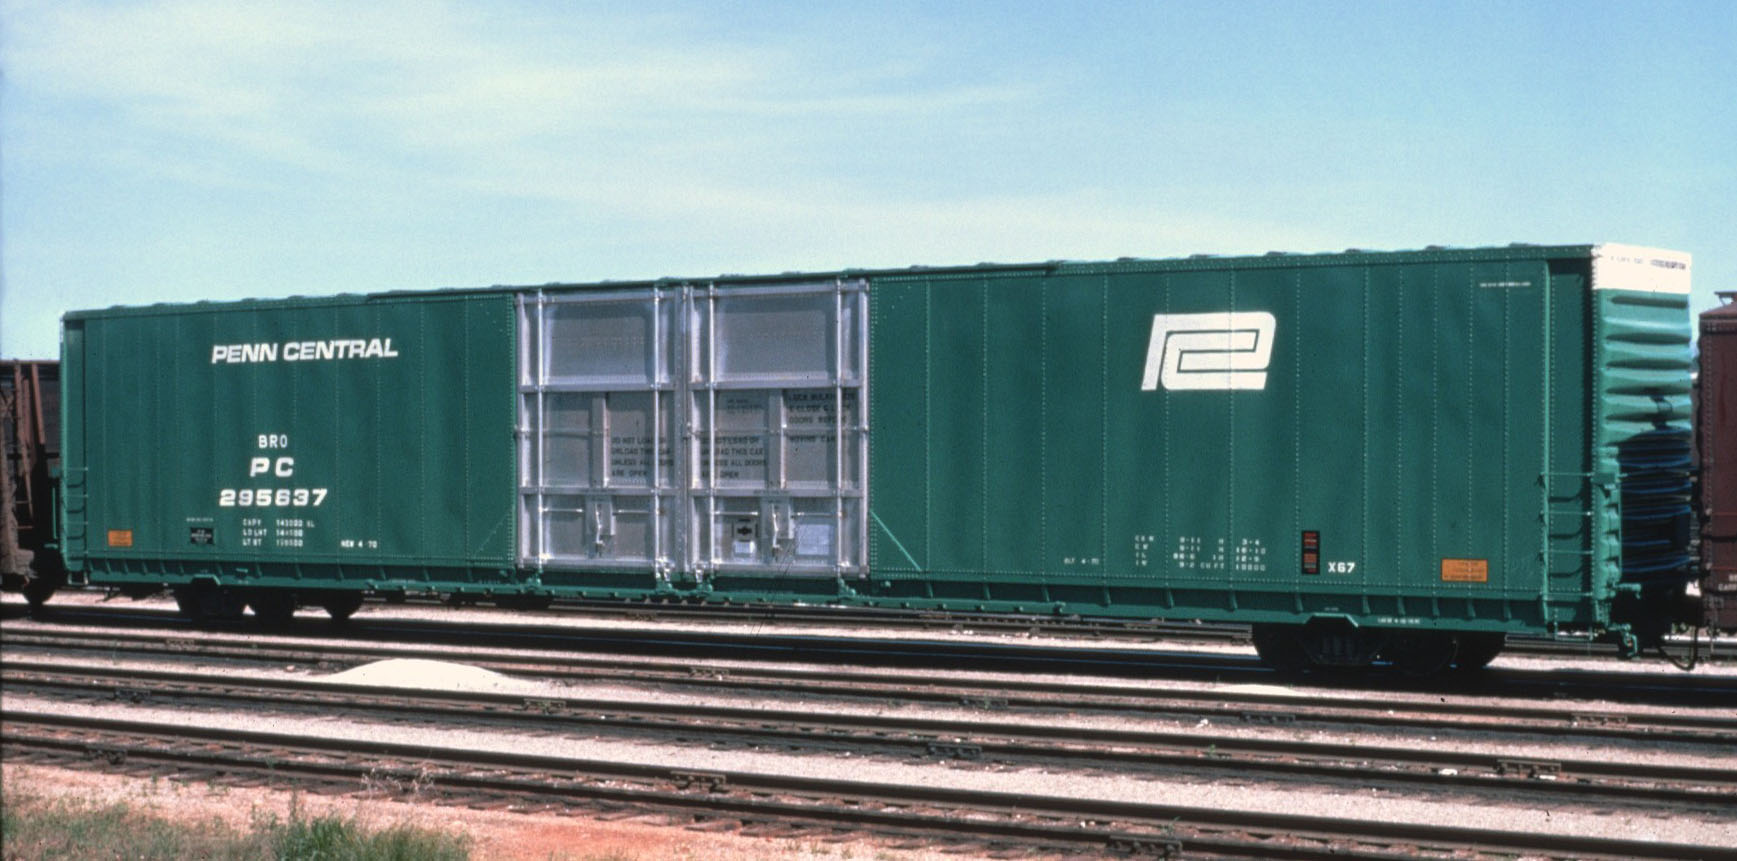
The next step was the finish painting.  I wanted to model the original car as used by the Penn Central seen below (photo from Hebners.net/Collection of Albert Phleep, photographer unknown).  The PC decals are included in the CCE Models X67 decal set along with the Conrail markings.


The roof appears to be unpainted on the original, and the doors are exposed aluminum as well, so the car was given a coat of a metallic silver from a rattle can.  I used my favorite metallic silver, Spaz Stix 10009, "Ultimate Mirror Chrome"--highly recommended (it can usually be found on Ebay and Amazon).

Once the silver had set, I masked the doors and roof.  I then airbrushed flat white on the top of the ends for the "excess height" band.  This band was also masked, and finally the whole car was airbrushed using Polly Scale Penn Central Green.

 
Removing the tape revealed the car in it's basic paint scheme.  I gave it two coats of Vallejo Gloss Varnish using the airbrush to seal the main finish and prepare for decals.
 

The decals went on easily, and I used the reference photo to help position them correctly.  MicroSet and MicroSol were used to get the decals to bond and settle to the surface, and after drying for a day, a coat of Vallejo Flat Varnish sealed them.

The frame and trucks were primed with Tamiya oxide red primer, and I then used Mr. Color rattle can roof brown to paint them an appropriate color for the trucks/underbody.  I also gathered some self-adhesive weights I had in the scrap-box to give the model better stability.  These came from an adjustable chassis set from TGauge.com

The trucks were assembled with Pin-Point Wheelsets from TGauge.com, and attached using the press-fit pins that come with the model.  The pins sometimes need to be slightly shaved/sanded (and/or the hole reamed out a bit) for the easiest fit.

Here is the assembled frame with wheelsets.

The frame assembly is an easy press-fit into the body, to complete the model:


This build is really not difficult, even though very small. As always a magnifying visor is an absolute necessity.  I like how the doors worked out and will be rolling out etched brass doors for all CCE Models with plug-doors.  The use of etched brass for details also opens up some other possiblities such as an enclosed auto rack.. stay "T"uned!   - Jesse